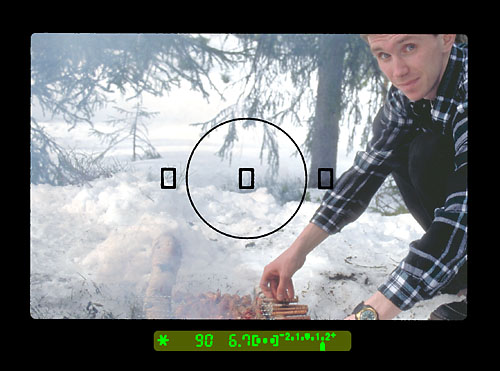
Viewfinder of Canon EOS 500N during partial metering in manual mode

When the partial metering button is pressed, the arrow position indicates the meter reading (the only real difference between a partial meter and spot meter available on high-end bodies is the size of the metering zone. It is slightly smaller for the spot meter). So if the arrow is in the middle of the scale, the object that fills the partial metering circle in the viewfinder will have medium tone on the film. The right end of the scale corresponds to light tones; +2 is the brightest white with no detail on slide film. On the image above, the arrow is pointing at +1.5 for snow. Dark tones are at the left end; objects for which the arrow is pointing at -2 will turn out almost black. So the scale itself pretty much represents the tonal range that can be recorded on slide film (for print film, metering is less critical and exposure errors can be fixed at the printing stage, to certain extent).
If a reading falls outside the scale, the arrow blinks at one of the scale ends. That means that either aperture and shutter speed should be adjusted, otherwise the metered object will be solid black or pure white on the film. There are slight corrections to these rules depending on the object color and texture (don't let me start on it, you will better learn it yourself by experience). I'll only say that often dark tones (e.g. black dress) or bright objects (e.g. street lights, specular reflections) are bound to be lost to solid black or transparent white, correspondingly, on an otherwise well looking slide. You may know it from the range of meter readings you are getting off the scene and will learn to anticipate what will be lost.
A knowledgeable reader might notice that this way of thinking remotely resembles the Zone System.
If areas of more or less continuous tone are too small to fill your metering circle, you can
partial metering: green -1.5, face +1, light dress up to +2That means, I checked foliage, skin tones and the brightest highlights and adjusted the exposure to make sure they all fit into the linear range of the film and will be recorded correctly, with visible details and appropriate relative brightness. But if you want to think it the usual way, just say "he metered her face and opened up one stop."
With experience, you may learn that certain objects in typical conditions look better when placed in certain zones on the scale. In the example above, I might well have checked the skin tone only, knowing that then the rest of the scene in the same light will render OK.
In addition to careful metering, I bracket exposure half (or third) stop under and over whenever practical, taking three consecutive shots instead of one and choosing the best looking frame after the film is developed. This helps to learn, insures best possible results and makes life simpler.
Do I mean this is the only way to get properly exposed pictures? Of course not. There are many ways to deal with the exposure issue and the best is the one that works for you.
Is metering information provided with my photos useful for you in learning exposure? It has a limited value, because for several reasons my slides look differently, sometimes very differently, on a web page displayed on your monitor than they do on my light table. You can't even compare one my photo to another because each scan is processed individually, to make it look the best. I still give metering information because my keepers are usually properly exposed and, well, some people just want to know it.
To learn exposure, you should take your own notes as you shoot and analyse them as you evaluate your slides. I am using a printed form for that purpose.